


A
Adventure MX
Guest
One of my regular customers brings his bike in for a couple of extra's and one of them is the Scott Oiler that needs to be fitted.
It comes in a nice little box with various mounting brackets for the oiler itself, extra tubing, cable ties, guides, the oiler, the breather and the injector.
As the KTM 990 has ABS as an optional extra, and this is mounted under the seat it leaves very little place to actually mount the oiler. This particular KTM 990 didn't have ABS and the customer suggested that I put it in the ABS box under the seat. I had a look at this option but was not satisfied for 4 reasons:
1. It is basically a sealed box and can be used to store goodies / spares / tools etc.
2. I don't like cutting on original plastics if it is at all possible. I like to keep the bike as original as possible.
3. Every time the oiler is empty you have to take the seat off to fill it up again, and that is to much of a mission.
4. The depth of the ABS box was not sufficient to get the whole oiler in comfortably.
Anyway the customer happened to print out an installation guide but the pictures made reference to a Super Duke which basically has the same frame. The only difference is that the frame is far more exposed then the KTM 990 which has it's tanks in the way and the rear plastics.
So I eventually decided on the option below:
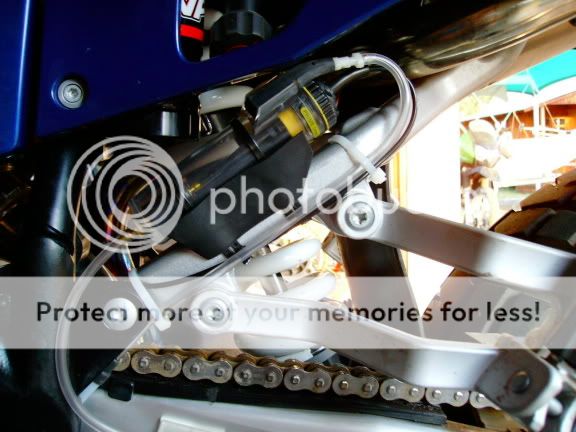
I decided to use the flexible rubber mounting on the subframe, just in front of the pillion footpeg. The only thing to remember is to route the vacuum tube and the breather away from the exhaust.
The oiler works on a vacuum system. This I took from the rear cylinder intake. It has a smaller pipe leading to a vacuum sensor. I basically cut an extra 4cms of tube and used the T-piece to connect the vacuum pipe of the oiler. I didn't cut the original tube just in case the customer decides to remove the oiler then he can just connect the T-piece and put the original tube back on the vacuum nipple.
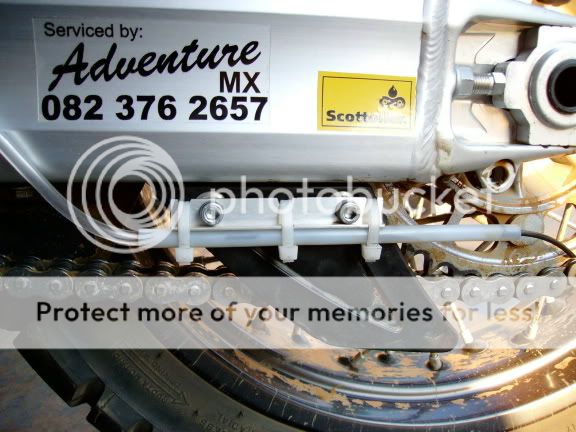
The main oiler tube was routed along the swingarm to the rear sprocket. In the picture you can see that I used the clear guides with double sided tape to keep the tube in place.
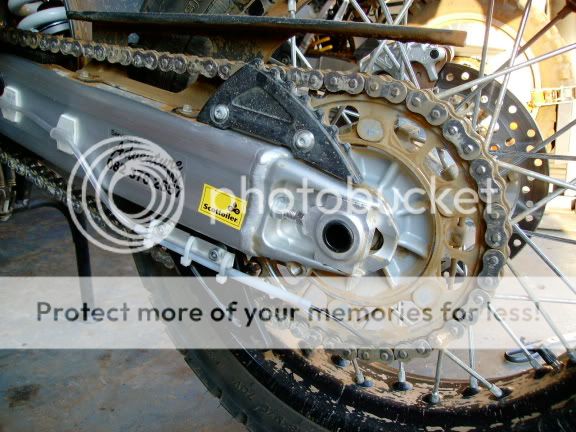
Then it came to mounting the injector tube to the swing arm. This had me slightly puzzled as they supplied to 2 plates which I couldn't work out where they had to go. So in the end I opted for a small little aluminium bracket that I made myself.
The injector tubes was therefore mounted to the outside of the sprocket. There is an optional extra to mount another injector tube to the inside of the sprocket but this was not available.
The customer took delivery of the bike and has since ridden it in De Wildt on a technical ride. According to feedback it is working well. The oiler has 9 settings on the dial. The customer reckons it works well on setting no:2.
It comes in a nice little box with various mounting brackets for the oiler itself, extra tubing, cable ties, guides, the oiler, the breather and the injector.
As the KTM 990 has ABS as an optional extra, and this is mounted under the seat it leaves very little place to actually mount the oiler. This particular KTM 990 didn't have ABS and the customer suggested that I put it in the ABS box under the seat. I had a look at this option but was not satisfied for 4 reasons:
1. It is basically a sealed box and can be used to store goodies / spares / tools etc.
2. I don't like cutting on original plastics if it is at all possible. I like to keep the bike as original as possible.
3. Every time the oiler is empty you have to take the seat off to fill it up again, and that is to much of a mission.
4. The depth of the ABS box was not sufficient to get the whole oiler in comfortably.
Anyway the customer happened to print out an installation guide but the pictures made reference to a Super Duke which basically has the same frame. The only difference is that the frame is far more exposed then the KTM 990 which has it's tanks in the way and the rear plastics.
So I eventually decided on the option below:
I decided to use the flexible rubber mounting on the subframe, just in front of the pillion footpeg. The only thing to remember is to route the vacuum tube and the breather away from the exhaust.
The oiler works on a vacuum system. This I took from the rear cylinder intake. It has a smaller pipe leading to a vacuum sensor. I basically cut an extra 4cms of tube and used the T-piece to connect the vacuum pipe of the oiler. I didn't cut the original tube just in case the customer decides to remove the oiler then he can just connect the T-piece and put the original tube back on the vacuum nipple.
The main oiler tube was routed along the swingarm to the rear sprocket. In the picture you can see that I used the clear guides with double sided tape to keep the tube in place.
Then it came to mounting the injector tube to the swing arm. This had me slightly puzzled as they supplied to 2 plates which I couldn't work out where they had to go. So in the end I opted for a small little aluminium bracket that I made myself.
The injector tubes was therefore mounted to the outside of the sprocket. There is an optional extra to mount another injector tube to the inside of the sprocket but this was not available.
The customer took delivery of the bike and has since ridden it in De Wildt on a technical ride. According to feedback it is working well. The oiler has 9 settings on the dial. The customer reckons it works well on setting no:2.