


Bergie
Race Dog
The Suzuki designers thought it good to bring as the DL without relays on the headlights.
I did the following modification to my DL650K7 (should be the same for the DL1000 and very similar for most motorbikes) which increased the voltage available on the headlights, and significantly increased the brightness of the headlights and Hi-beams.
The system is wired that all the current goes through the switch on the handle bar. As the terminals wear and corrode over time the performance of the lights will deteriorate (actually the electrical resistance becomes more which restricts voltage flow). We will use the existing light circuit to trigger the two relays. (One at a time. When the driving lights are on, the Brights are off, and when the Brights are turned on, the driving lights go off) The place where we pick-up the signal from the existing headlight circuit, will be on the plug that fits onto the headlight bulb.
What to buy:
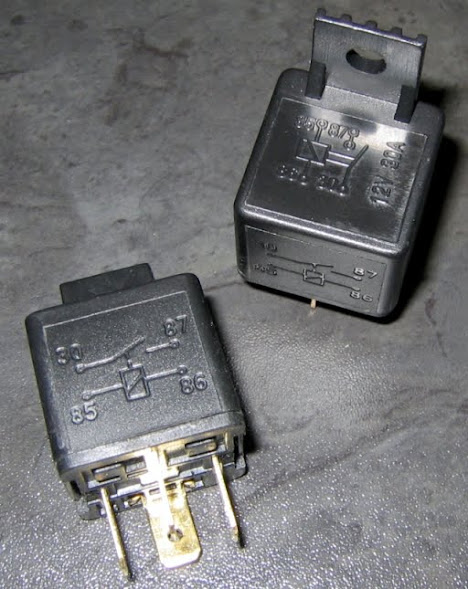
2 Relays (4 pin type)
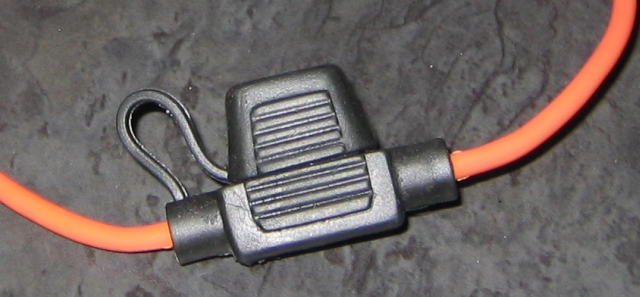
1 Inline Fuse holder with Fuse
4m of 6.5mm copper wire
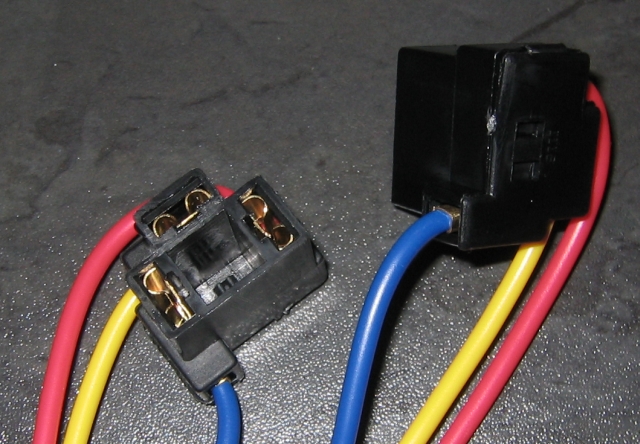
2 x H4 Headlight bulb connectors
12 x Female blade type crimp connectors (to connect wires to Relays)
3 x Male blade type crimp connectors (to connect to old H4 plug)
2 x Washer type crimp connectors to fit onto the bike battery

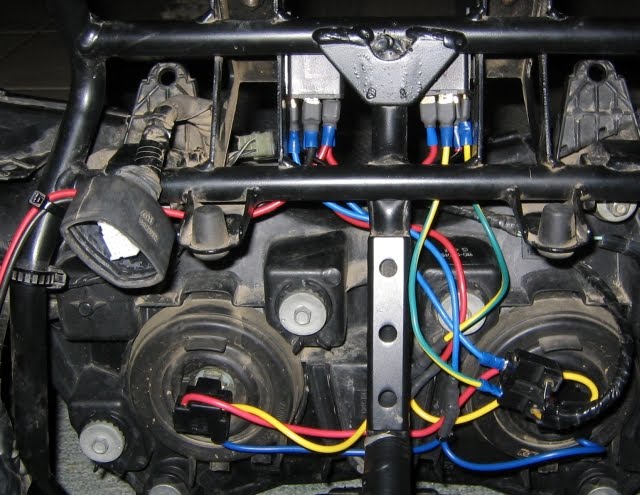
First step would be to remove the front fairings to get access to a tidy mounting area for the relays and the wiring. This is the section you want to get to.

Pull the headlight connectors off the bulbs installed into the headlight unit.

This is where I decided to “mount” my relays. They will not be accessable at all, but they will stay dry and secure in there.

You can see I cable tied them in place. This is obviously after all the wires have been cut and crimped to length.
I would recommend that you put the relays in place and fit the H4 Female connectors to the back of the light bulbs to start with, this way you can accurately determine the lengths of wire required to build your wire harnass. Mine looked something like this after everything was done.
You can see the two male blades at the bottom of the image, they will connect into the old H4 plugs that we removed from the bulbs at the start.
The red and black wires that run to the top of the image, are the two power wires that run to the battery.

The wires will run like this:
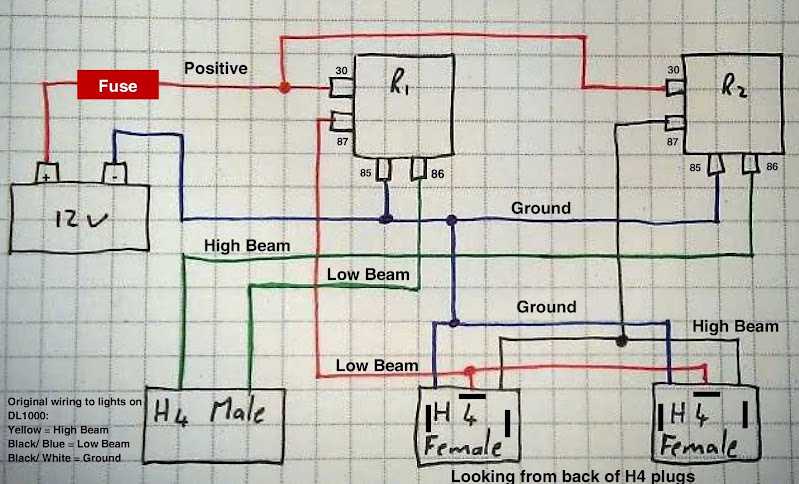
The H4 connector has 1 Ground connection, and then two separate connections, one for High beam and one for normal driving lights.
The wire running to the High beam relay must go into the right hand side (as looking from behind) connector, and the wire running to the normal light relay must go into the top horizontal slot.
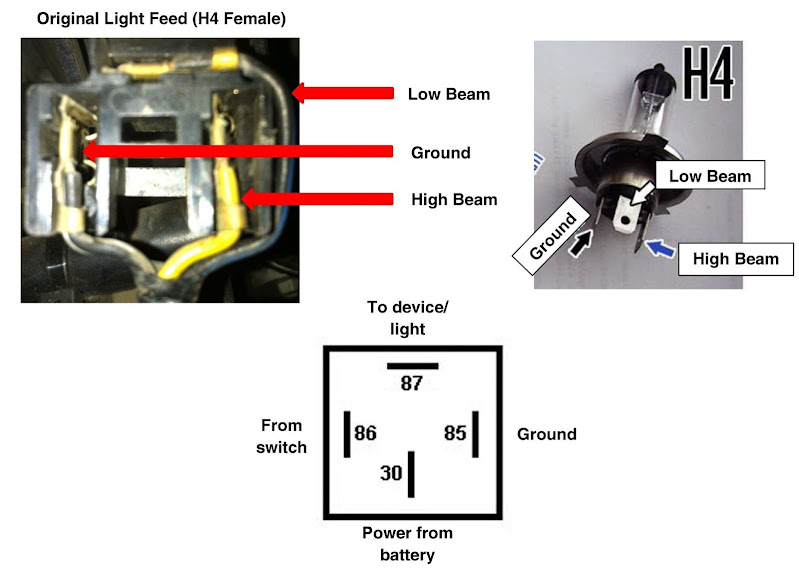
Special thanks to LTB for putting my ideas into something understandable to be able to share on this forum! The numbering on relays are mostly generic, but if your numbers differ, make sure you understand the function of a relay and figure it out.
Then once everything is tidy up front, you need to run two wires to the battery. I added a quick release connection next to the big white electrical connector that connects all the wiring for the front section of the bike. This way it can be taken off quicly without having to get to the relays. (and use the same wires from the battery for cig lighter plug)

At the battery, the fuse, don’t connect anything without a fuse in line – you have been warned.
This is the difference in results I got on my previous DL with the same setup:
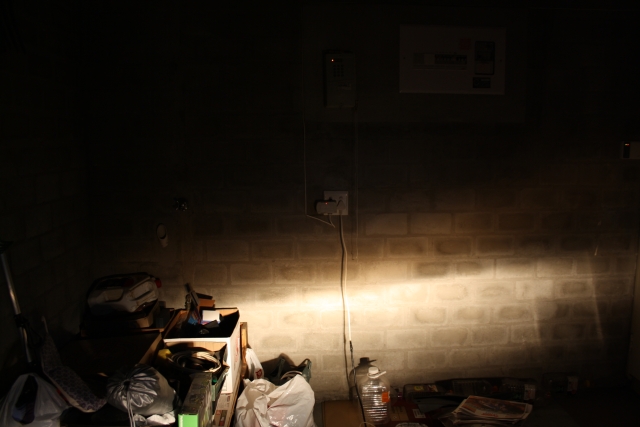 Dims no Relay
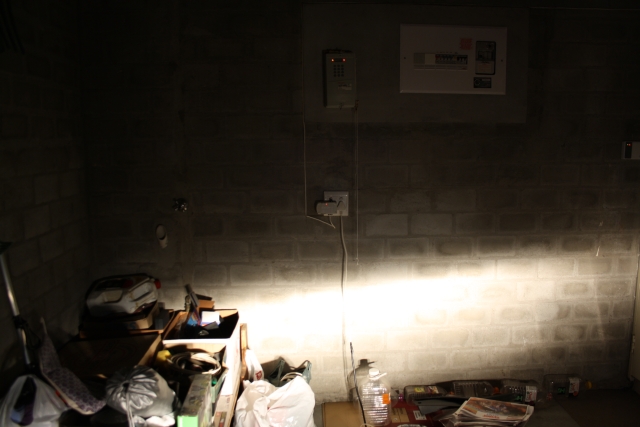 Dims with Relay
 Brights no Relay
 Brights with Relay
This post was written in a hurry, will clean it up later
I did the following modification to my DL650K7 (should be the same for the DL1000 and very similar for most motorbikes) which increased the voltage available on the headlights, and significantly increased the brightness of the headlights and Hi-beams.
The system is wired that all the current goes through the switch on the handle bar. As the terminals wear and corrode over time the performance of the lights will deteriorate (actually the electrical resistance becomes more which restricts voltage flow). We will use the existing light circuit to trigger the two relays. (One at a time. When the driving lights are on, the Brights are off, and when the Brights are turned on, the driving lights go off) The place where we pick-up the signal from the existing headlight circuit, will be on the plug that fits onto the headlight bulb.
What to buy:
2 Relays (4 pin type)
1 Inline Fuse holder with Fuse
4m of 6.5mm copper wire
2 x H4 Headlight bulb connectors
12 x Female blade type crimp connectors (to connect wires to Relays)
3 x Male blade type crimp connectors (to connect to old H4 plug)
2 x Washer type crimp connectors to fit onto the bike battery
First step would be to remove the front fairings to get access to a tidy mounting area for the relays and the wiring. This is the section you want to get to.
Pull the headlight connectors off the bulbs installed into the headlight unit.
This is where I decided to “mount” my relays. They will not be accessable at all, but they will stay dry and secure in there.
You can see I cable tied them in place. This is obviously after all the wires have been cut and crimped to length.
I would recommend that you put the relays in place and fit the H4 Female connectors to the back of the light bulbs to start with, this way you can accurately determine the lengths of wire required to build your wire harnass. Mine looked something like this after everything was done.
You can see the two male blades at the bottom of the image, they will connect into the old H4 plugs that we removed from the bulbs at the start.
The red and black wires that run to the top of the image, are the two power wires that run to the battery.
The wires will run like this:
The H4 connector has 1 Ground connection, and then two separate connections, one for High beam and one for normal driving lights.
The wire running to the High beam relay must go into the right hand side (as looking from behind) connector, and the wire running to the normal light relay must go into the top horizontal slot.
Special thanks to LTB for putting my ideas into something understandable to be able to share on this forum! The numbering on relays are mostly generic, but if your numbers differ, make sure you understand the function of a relay and figure it out.
Then once everything is tidy up front, you need to run two wires to the battery. I added a quick release connection next to the big white electrical connector that connects all the wiring for the front section of the bike. This way it can be taken off quicly without having to get to the relays. (and use the same wires from the battery for cig lighter plug)
At the battery, the fuse, don’t connect anything without a fuse in line – you have been warned.
This is the difference in results I got on my previous DL with the same setup:
This post was written in a hurry, will clean it up later