


- Joined
- Feb 6, 2006
- Messages
- 10,679
- Reaction score
- 4,405
- Location
- Cape Town, deep in the lentils
- Bike
- KTM 990 Adventure
Some notes for those of you who have the POV1 or POV1.5 Helmet cam
Settings;
I have found that having the camera on loop mode is way better. The lengths of the loop is for me set at 1 minute. I find that long enough to get what I need. You’ll be surprised when riding how long a minute is.
I have the camera set at its highest settings for frame rate and resolution.
The remote;
The remote is mounted on the left bar, closest to the grip. I have the remote with the record side on top. To stop the remote swivelling around the bar, I put masking tape under it. Practice using it. It is pretty difficult to control the bike in technical stuff and get to it. But try anyway, you might get a good peice of falling on video.
The remotes battery lasts about a year. Keep a spare, it is a game breaker if for example it goes flat close to Peternoster on a trip to the Richtersveld.
The camera lens unit;
Is very robust. However the lens itself, which is surprisingly thin, can get cracked by stones from following other bikes. To import a lens costs close to R700. There is a way cheaper option. All watch makers get their watch faces from suppliers. These suppliers have standard width & thickness lenses/faces. These cost about R10-20 each and are no different to the ones POV will give you. I got a few ranging in thickness of 0.5mm to 1.5mm. You can get crystal lenses but the standard glass ones are apparently better.
The lens units internal focusing and capturing unit is tiny. Mine slowly lost the peripheral focus. This apparently happened with the older units and has subsequently been resolved. VIO will replace this under warranty but it is a mission to send yours back over there for them to check. Postage is a killer. It works out cheaper to just buy another camera lens. I took mine apart and had them send me another focusing unit. You will also need specialised Allen keys. They are .4 and .5mm. No one I know stocked these including watchmakers.
If you want to change the focus of the unit you have to have these Allen keys.
The recording unit;
Tighten the screws in on the face of the unit, one of mine worked loose.
I have mine either in my Touring jackets top left pocket or if I am doing technical zip tied to the chest of my ballistic jacket.
I use rechargeable batteries. I have 3 sets and a charger that I can run off the bikes system. The batteries last for about 5-6 hours of continuous recording. As a result of losing a lot of footage because the unit turns itself off when the batteries get too low I now religiously change the set at lunch time regardless of how much battery charge is left.
I make it a habit to regularly look for the flashing red recoding light just to make sure the unit it switched on. This can be a mission if it is attached to my ballistic jacket – but that’s what mirrors are for.
Once the camera is recording I set the recorders buttons to lock. This prevents the camera for doing anything stupid as a result of normal riding. This I would consider a must do.
SD cards;
I used to use 2 Gig as that was all the camera could take. If you haven’t there is a firmware upgrade that is free to owners of the camera that allows you to use 8 Gig cards. At its highest resolution, this equates to more than 5 hours of continuous recording. If you are a record hog, you’d be hard pressed to record more than about 4Gigs a day if the loop is set to a minute.
Once the card is full, I lock the card, just so that I don’t accidentally record over what I have. This is pretty hard to do anyway as the unit can’t record over anything – you have to format the card to “clear” it before you can that. But I don’t want to risk it anyway.
General thoughts on recording;
Practice narrating your riding whist riding. It takes some skill but the result is often way better when playing the result back. It takes a conscious effort and is easily forgotten.
Riding behind people of often more interesting to watch on video than with nobody in front. Unless it is gnarly or you are good at crashing often.
Remember that the camera flattens stuff out a lot. It also tends to make the ride look slower than it is.
I make it a habit to wipe the lens unit often particularly when in dust a lot or on the coast. All it takes is the tip of my glove. Also check for road kill on the lens. A dead bug can muck up a good days video.
Check the positioning of the lens on the helmet before you ride. I like to stand with my helmet on and the recorder unit in my hand and then using the LCD window on the unit to check that when I am looking straight ahead that the lens unit is rotated horizontal and is elevated high enough that lens unit is not staring at your handlebars all day. The lens can rotate in its housing particularly if you mount the lens unit to the bike. Make sure that you use strong enough O-rings to keep it in place.
Just because you have a video camera don’t forget to take photo’s too. The video does not replace the photo’s it augments it. You’ll be sorry later if you don’t take photo’s, trust me.
Editing the video
After trying the software that comes with the camera, i did some searching and trying. Not being a professional at this I was frustrated by most of the stuff out there.
After much wasted effort the best solution was on my machine all along. Windows Movie Maker comes standard with Windows! It’s pretty simple drag and drop. I have learnt to make an edited version of all the video taken, then once I have saved that (save often by the way) I get ruthless and edit the edited version. It is amazing how much crap we like to think is going to interest others. Hours and hours of road whizzing by gets boring fast.
I have also learnt that music to a video can be a killer. I keep the original sound and add a background track only if there is not much talking.
Mounting the Lens unit on the Helmet;
Initially this was just a makeshift arrangement, but it has worked so well and obviously swapping it out to my push bike is easy - no clips or tape.
I have an Arai TX3, the camera is mounted on the side of the helmet with the supplied squares of Velcro tape.
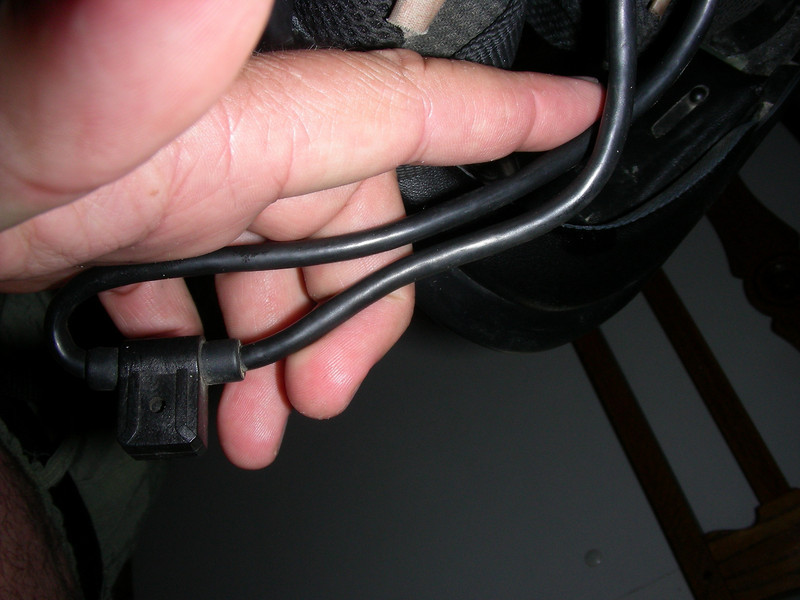
I then run the cable into the helmet under the cheek pads.
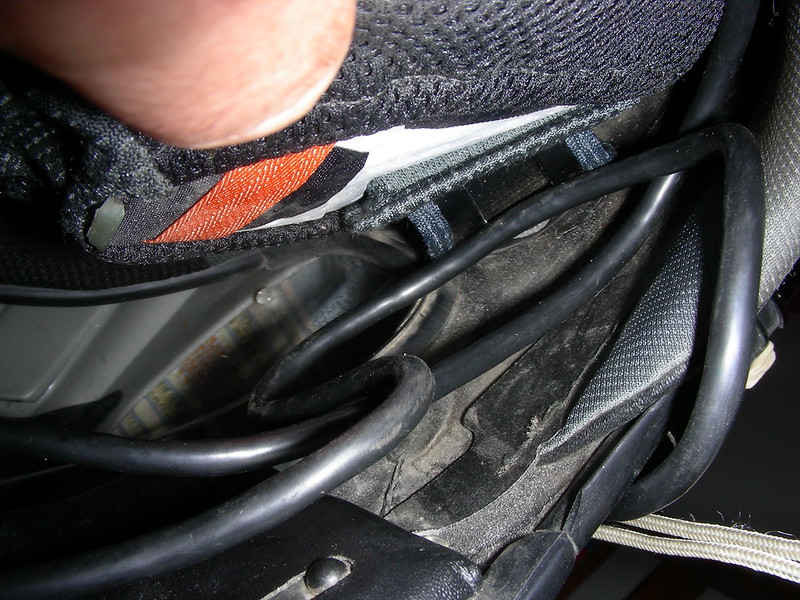
To get it right I double the cable at the microphone and place it just to the right of where my mouth is right beside the end of the cheek pad. I have tried it with the mic opening towards my mouth and towards the helmet. It is more comfortable for me with the hole towards the mouth. The downside is the heavy breathing.
I run the pickup setting for the mic at 3
I then run both cables back in behind the cheek pad. The side that runs out to the camera has a bit more in the cheek pad than the bit that runs to the camera.
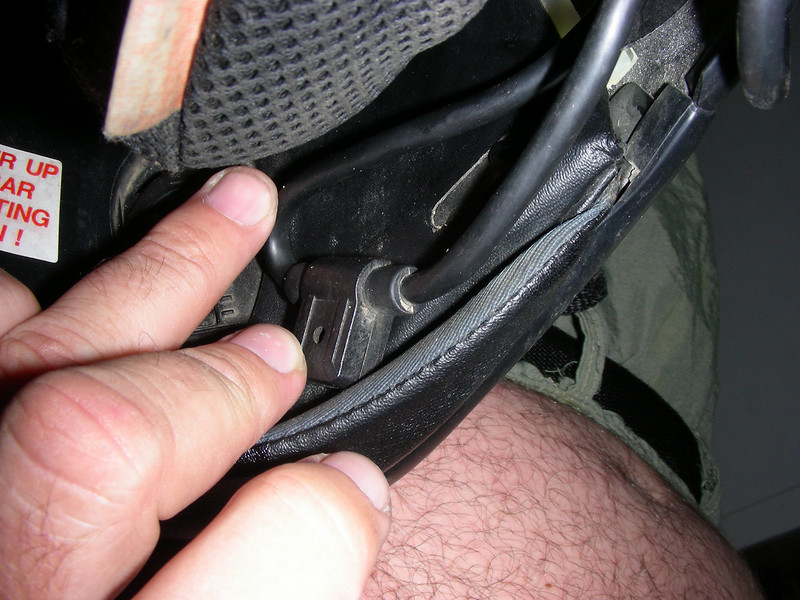
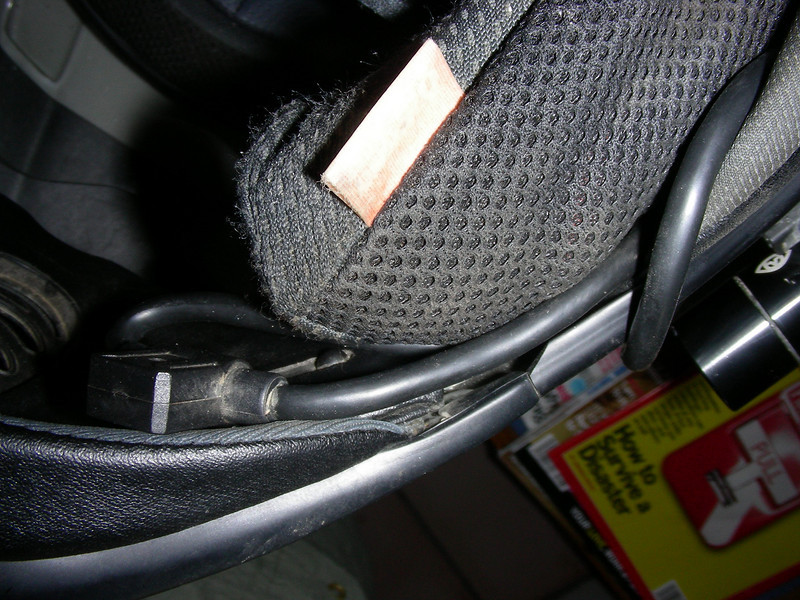
So that the microphone sits here;
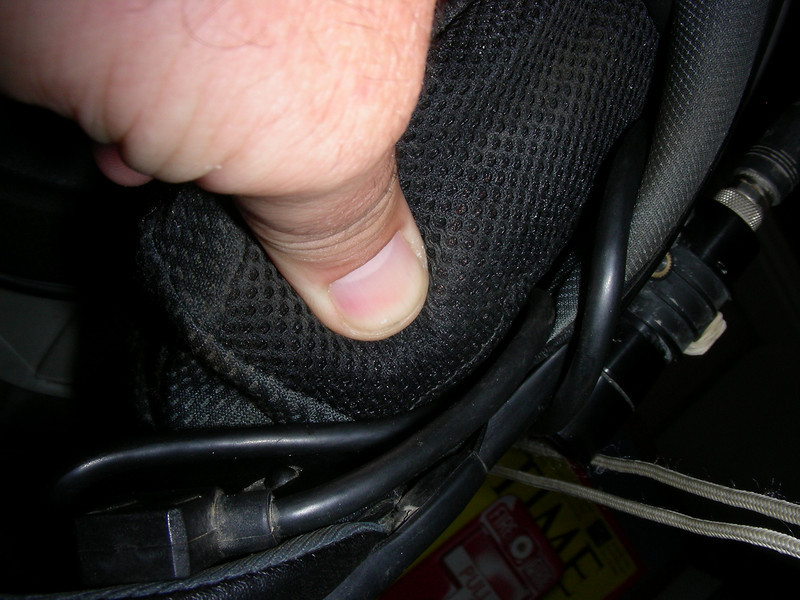
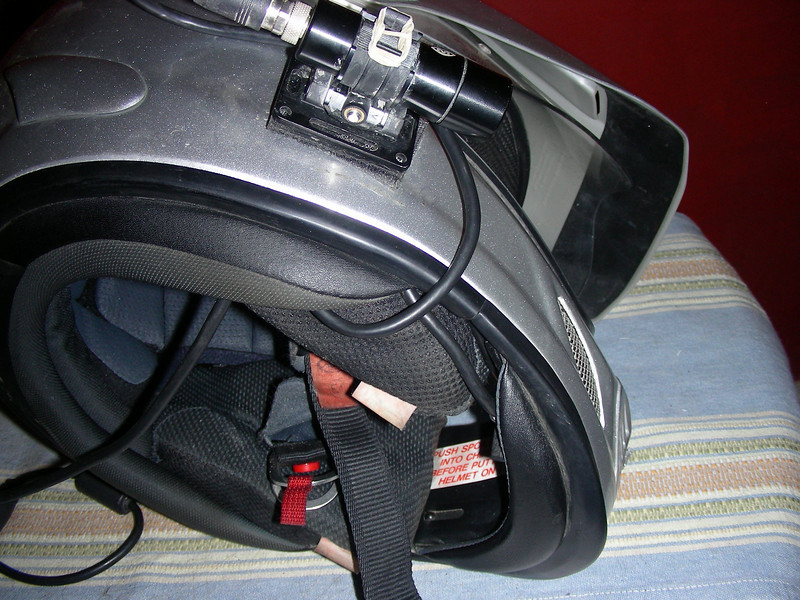
What it looks like all in. Sometimes I feel the mic is sitting low and just give it a push back in with my thumb.
I make the cable come back forward over the lens before going down and under the helmet as I have found that the cable sometimes catches on the clips of the Leatt Brace if I don't do this.

I keep the camera in my left breast pocket of my jacket. The cable from the camera to the helmet is run under the chest strap for my camelbak but above the Leatt brace.
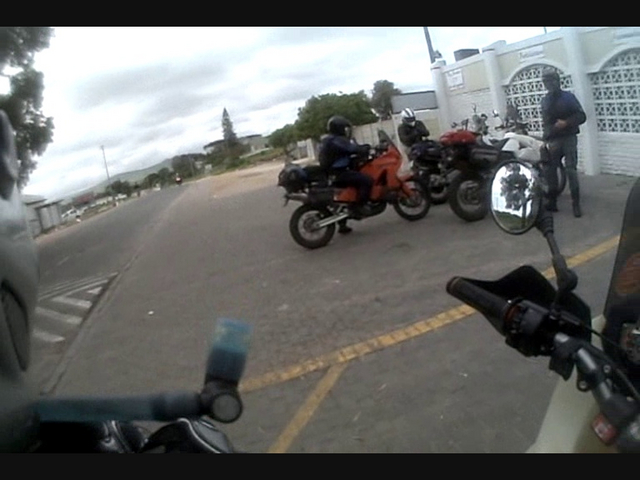
Here’s an example from the last trip that I was on that has both the good and the bad. You can see near the front the coastal air gets onto the lens making a bit of it fuzzy. This was a result of not cleaning often. Later, after the crash the lens unit had rotated in the mount – the horizon is now skewed. You can also see me on occasions using the remote.
Tell me how you go, or add your pearls, Cheers
Andrew
Settings;
I have found that having the camera on loop mode is way better. The lengths of the loop is for me set at 1 minute. I find that long enough to get what I need. You’ll be surprised when riding how long a minute is.
I have the camera set at its highest settings for frame rate and resolution.
The remote;
The remote is mounted on the left bar, closest to the grip. I have the remote with the record side on top. To stop the remote swivelling around the bar, I put masking tape under it. Practice using it. It is pretty difficult to control the bike in technical stuff and get to it. But try anyway, you might get a good peice of falling on video.
The remotes battery lasts about a year. Keep a spare, it is a game breaker if for example it goes flat close to Peternoster on a trip to the Richtersveld.
The camera lens unit;
Is very robust. However the lens itself, which is surprisingly thin, can get cracked by stones from following other bikes. To import a lens costs close to R700. There is a way cheaper option. All watch makers get their watch faces from suppliers. These suppliers have standard width & thickness lenses/faces. These cost about R10-20 each and are no different to the ones POV will give you. I got a few ranging in thickness of 0.5mm to 1.5mm. You can get crystal lenses but the standard glass ones are apparently better.
The lens units internal focusing and capturing unit is tiny. Mine slowly lost the peripheral focus. This apparently happened with the older units and has subsequently been resolved. VIO will replace this under warranty but it is a mission to send yours back over there for them to check. Postage is a killer. It works out cheaper to just buy another camera lens. I took mine apart and had them send me another focusing unit. You will also need specialised Allen keys. They are .4 and .5mm. No one I know stocked these including watchmakers.
If you want to change the focus of the unit you have to have these Allen keys.
The recording unit;
Tighten the screws in on the face of the unit, one of mine worked loose.
I have mine either in my Touring jackets top left pocket or if I am doing technical zip tied to the chest of my ballistic jacket.
I use rechargeable batteries. I have 3 sets and a charger that I can run off the bikes system. The batteries last for about 5-6 hours of continuous recording. As a result of losing a lot of footage because the unit turns itself off when the batteries get too low I now religiously change the set at lunch time regardless of how much battery charge is left.
I make it a habit to regularly look for the flashing red recoding light just to make sure the unit it switched on. This can be a mission if it is attached to my ballistic jacket – but that’s what mirrors are for.
Once the camera is recording I set the recorders buttons to lock. This prevents the camera for doing anything stupid as a result of normal riding. This I would consider a must do.
SD cards;
I used to use 2 Gig as that was all the camera could take. If you haven’t there is a firmware upgrade that is free to owners of the camera that allows you to use 8 Gig cards. At its highest resolution, this equates to more than 5 hours of continuous recording. If you are a record hog, you’d be hard pressed to record more than about 4Gigs a day if the loop is set to a minute.
Once the card is full, I lock the card, just so that I don’t accidentally record over what I have. This is pretty hard to do anyway as the unit can’t record over anything – you have to format the card to “clear” it before you can that. But I don’t want to risk it anyway.
General thoughts on recording;
Practice narrating your riding whist riding. It takes some skill but the result is often way better when playing the result back. It takes a conscious effort and is easily forgotten.
Riding behind people of often more interesting to watch on video than with nobody in front. Unless it is gnarly or you are good at crashing often.
Remember that the camera flattens stuff out a lot. It also tends to make the ride look slower than it is.
I make it a habit to wipe the lens unit often particularly when in dust a lot or on the coast. All it takes is the tip of my glove. Also check for road kill on the lens. A dead bug can muck up a good days video.
Check the positioning of the lens on the helmet before you ride. I like to stand with my helmet on and the recorder unit in my hand and then using the LCD window on the unit to check that when I am looking straight ahead that the lens unit is rotated horizontal and is elevated high enough that lens unit is not staring at your handlebars all day. The lens can rotate in its housing particularly if you mount the lens unit to the bike. Make sure that you use strong enough O-rings to keep it in place.
Just because you have a video camera don’t forget to take photo’s too. The video does not replace the photo’s it augments it. You’ll be sorry later if you don’t take photo’s, trust me.
Editing the video
After trying the software that comes with the camera, i did some searching and trying. Not being a professional at this I was frustrated by most of the stuff out there.
After much wasted effort the best solution was on my machine all along. Windows Movie Maker comes standard with Windows! It’s pretty simple drag and drop. I have learnt to make an edited version of all the video taken, then once I have saved that (save often by the way) I get ruthless and edit the edited version. It is amazing how much crap we like to think is going to interest others. Hours and hours of road whizzing by gets boring fast.
I have also learnt that music to a video can be a killer. I keep the original sound and add a background track only if there is not much talking.
Mounting the Lens unit on the Helmet;
Initially this was just a makeshift arrangement, but it has worked so well and obviously swapping it out to my push bike is easy - no clips or tape.
I have an Arai TX3, the camera is mounted on the side of the helmet with the supplied squares of Velcro tape.
I then run the cable into the helmet under the cheek pads.
To get it right I double the cable at the microphone and place it just to the right of where my mouth is right beside the end of the cheek pad. I have tried it with the mic opening towards my mouth and towards the helmet. It is more comfortable for me with the hole towards the mouth. The downside is the heavy breathing.
I run the pickup setting for the mic at 3
I then run both cables back in behind the cheek pad. The side that runs out to the camera has a bit more in the cheek pad than the bit that runs to the camera.
So that the microphone sits here;
What it looks like all in. Sometimes I feel the mic is sitting low and just give it a push back in with my thumb.
I make the cable come back forward over the lens before going down and under the helmet as I have found that the cable sometimes catches on the clips of the Leatt Brace if I don't do this.
I keep the camera in my left breast pocket of my jacket. The cable from the camera to the helmet is run under the chest strap for my camelbak but above the Leatt brace.
Here’s an example from the last trip that I was on that has both the good and the bad. You can see near the front the coastal air gets onto the lens making a bit of it fuzzy. This was a result of not cleaning often. Later, after the crash the lens unit had rotated in the mount – the horizon is now skewed. You can also see me on occasions using the remote.
Tell me how you go, or add your pearls, Cheers
Andrew